| |   | | | Scan Dialog Box/Direct Scan Tutorial Part 1: When to Use the Scan Dialog box Part 2: Accessing the Scan Dialog box Part 3: Components of the Scan Dialog box Part 4: Using the Scan Dialog box
| Fax Clicking on the Fax icon brings up the following options: 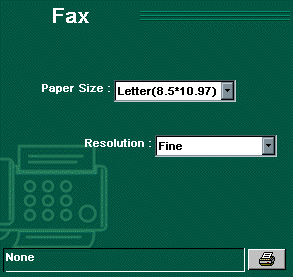
- Select the Paper Size from the pull-down menu. The choices include A4, Letter, and, depending on the scanner model, Legal or A3. There is also an option called Auto. This will make the scanner do a prescan first and then crop to the edge of the document so that only it is scanned.
- Choose the Scan Mode from the pull-down menu. The document can be in Gray, Color or Text (Line Art) mode. Text will be the best choice for most documents.
- Choose a Resolution. The menu gives the options for Fine or Superfine. Fine is generally the best choice for faxing most documents.
- The Printer icon
 is used to select the fax driver being used. If the default driver is not already selected, click this icon and select the appropriate fax driver for the fax modem and software installed in the system. A fax driver will be listed along with the printer drivers, but it will generally have the term "fax" or the name of the fax software in its title. is used to select the fax driver being used. If the default driver is not already selected, click this icon and select the appropriate fax driver for the fax modem and software installed in the system. A fax driver will be listed along with the printer drivers, but it will generally have the term "fax" or the name of the fax software in its title. - Once all of the settings are chosen, click on the Scan Command icon on the right-hand side. The Scan Dialog box will disappear and a small progress indicator will appear. After the scan has completed, the document will be sent to the fax driver and the fax software should then start and prompt for the fax information, such as telephone number. (This will vary depending on the fax software.)
| | To learn how to use a function, click on its icon. | | Scan | Copy | Fax | E-mail | OCR | | 
| 
| 
| 
| 
| | | | | |